A Breakdown Of All The Chain Link Fence Parts
If you need help learning all the parts of a fence, this handy guide will show you exactly where everything goes. Remember that there is no one-size-fits-all for chain link fence installations, and you may find variations within the installation process depending on the installer's preference and the landscape the chain link fence will go in.
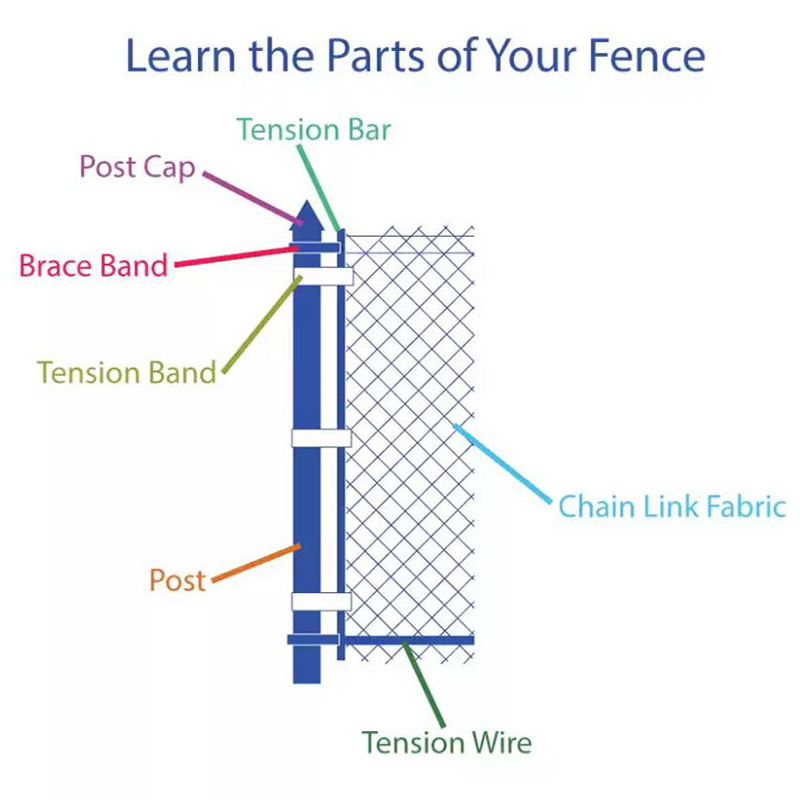
Common Parts Of A Chain Link Fence:
- Tension Bar — The tension bar is used to hold the mesh in place and further tighten the tension. The tension bar attaches to the terminal post.
- Post Cap — The post cap is what goes at the top of a terminal post. Post caps come in various shapes. Line post caps are used if a top rail will go on a chain link fence.
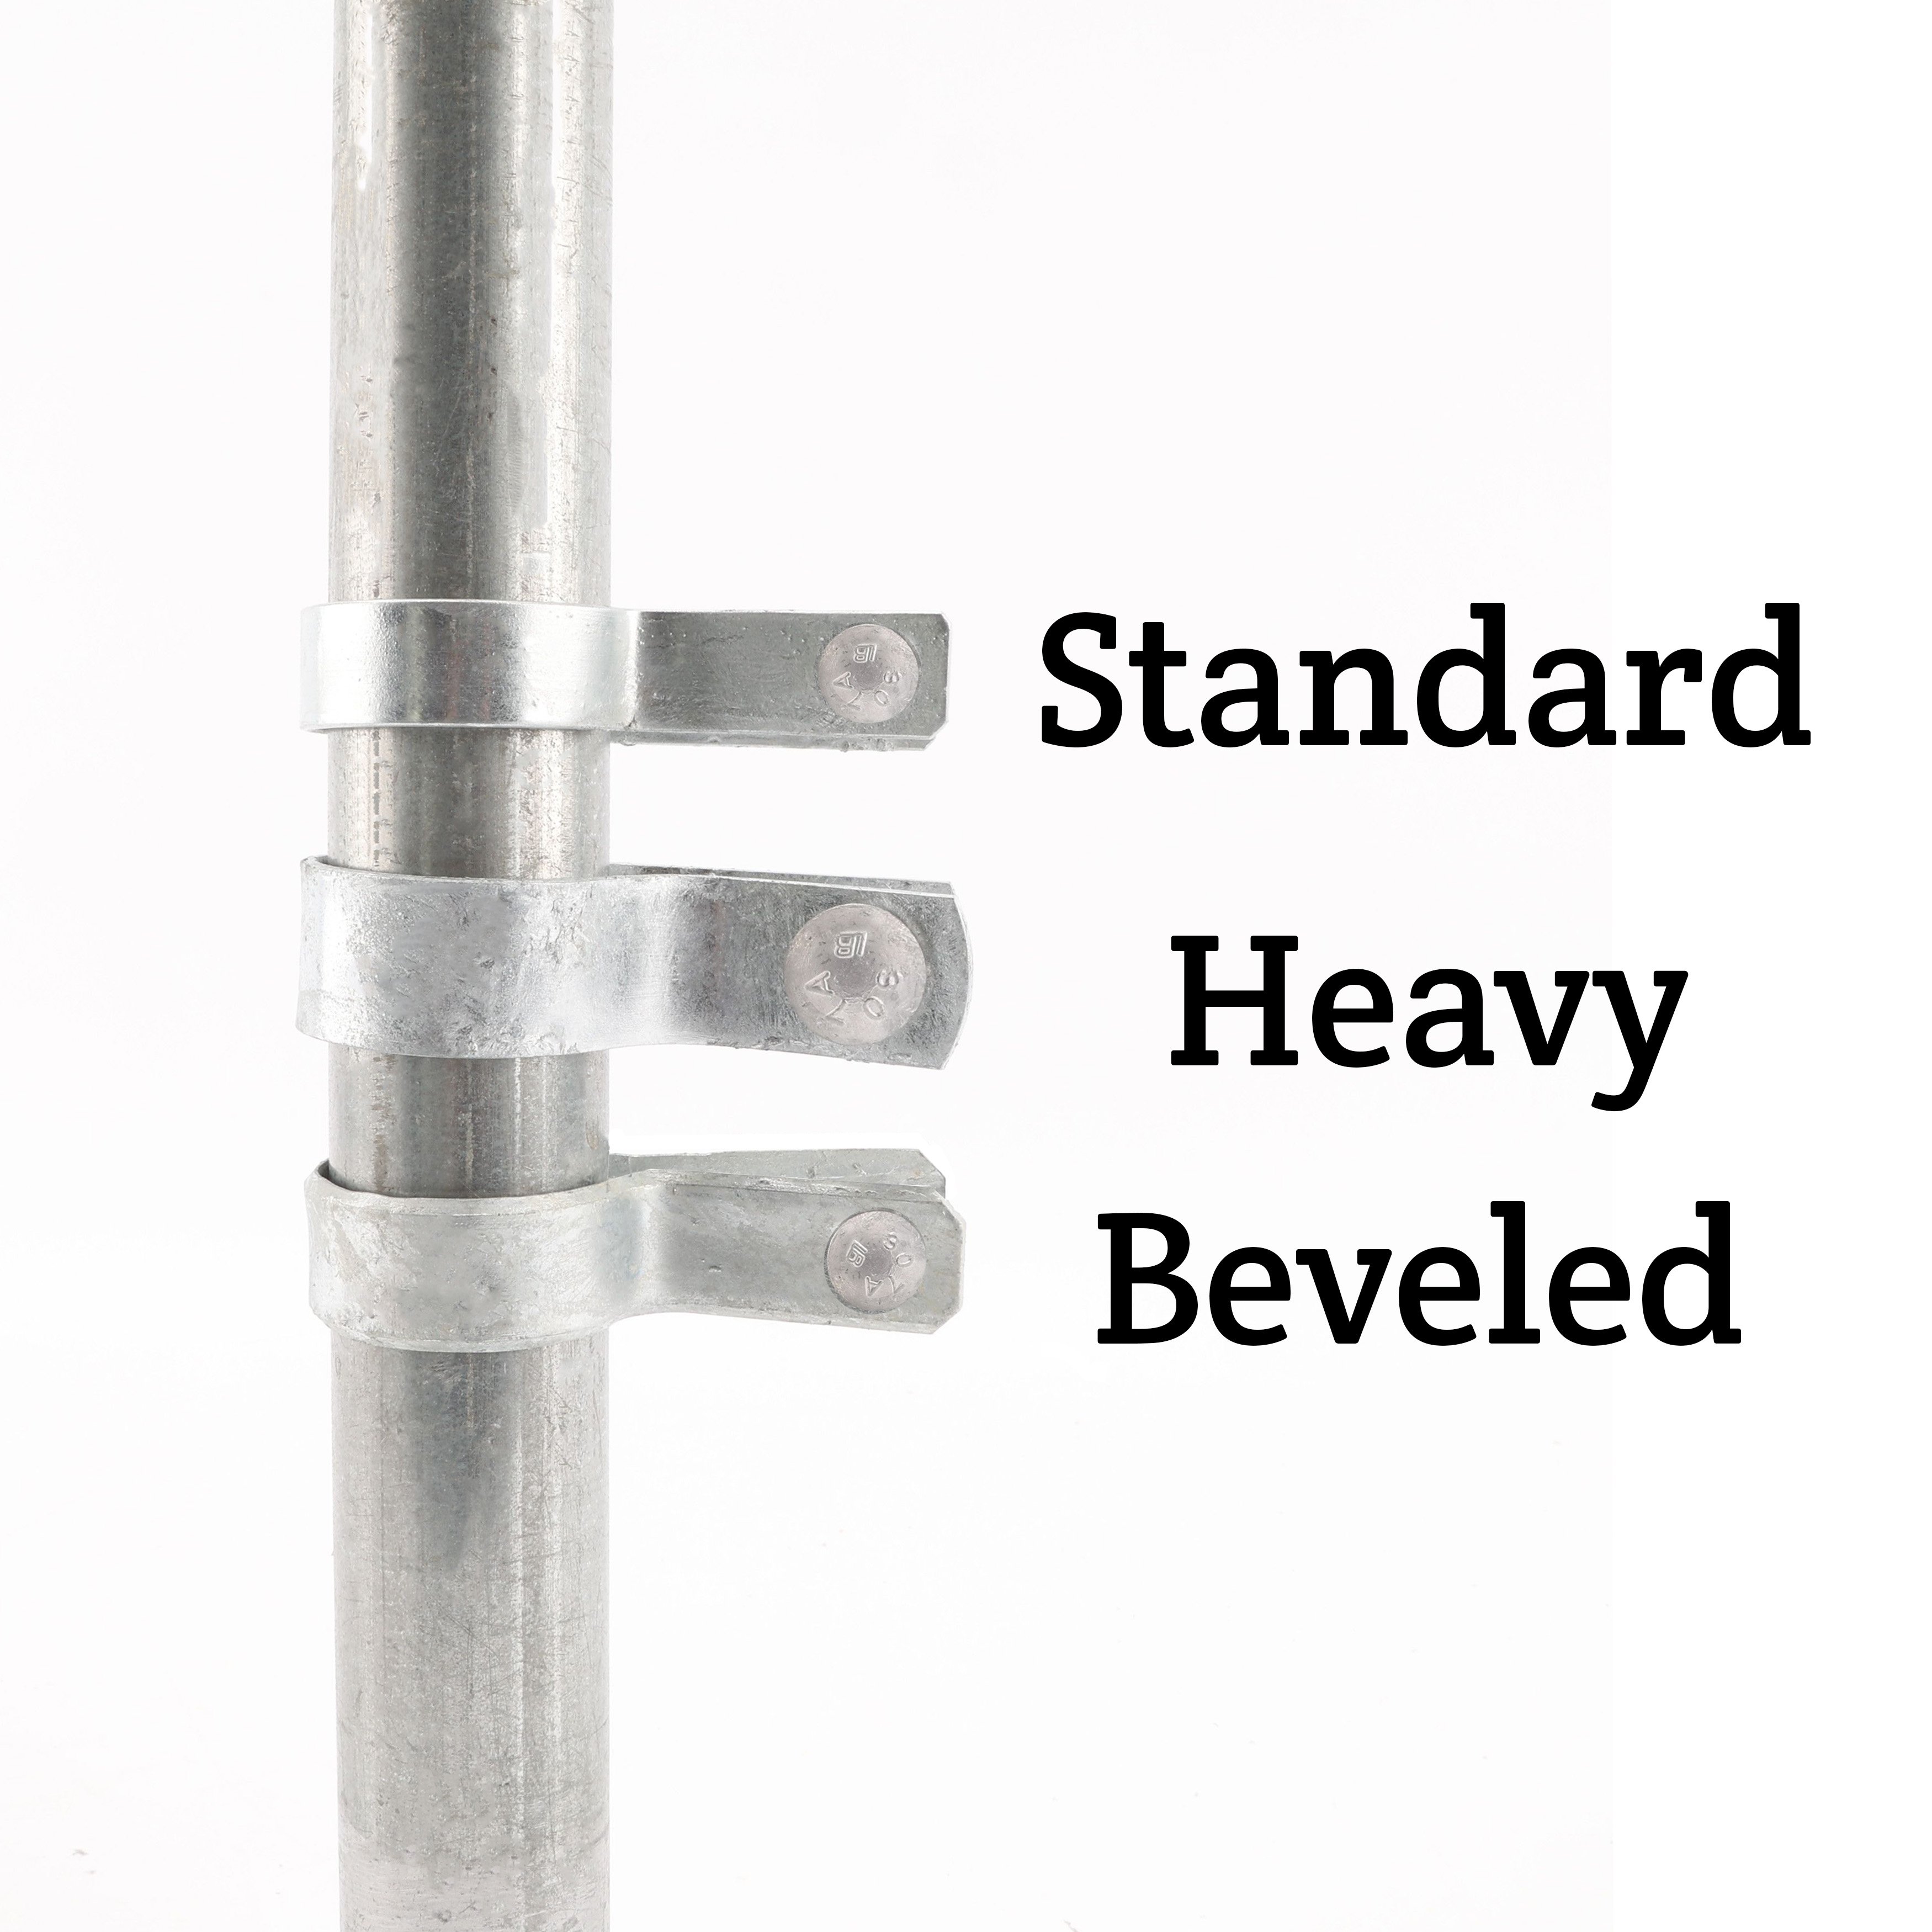
- Brace Band — Use brace bands to attach the chain link top rail to the corner post, end post, gate post, or frame. Brace bands go around the terminal post and help keep everything in place.
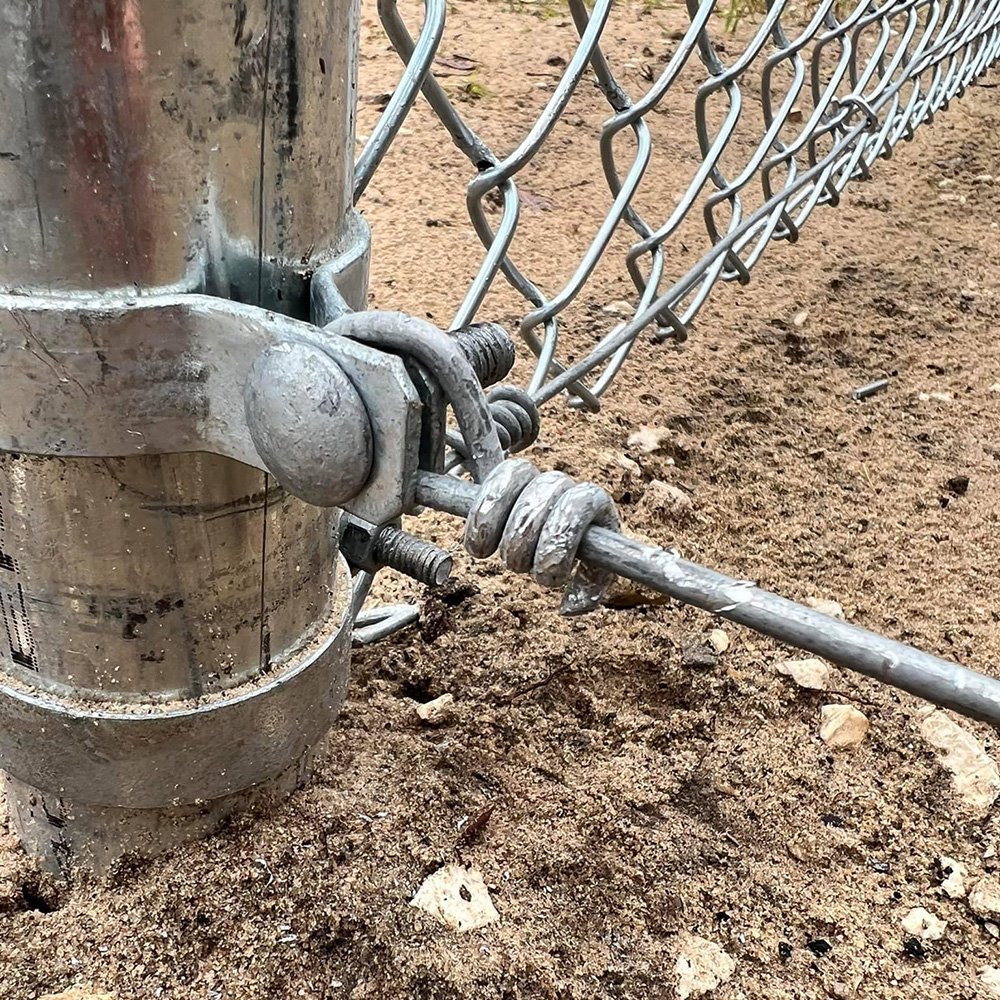
- Tension Band — If you need to attach the chain link mesh to a terminal post, tension bands help you create a secure connection. This is used alongside the tension bar to secure your chain link fence.
- Terminal Post — Whenever you need to change the direction of your chain link fence or install a gate, terminal posts help create a strong end line. Use this post along with the other fittings to ensure you will have a stable fence.
- Tension Wire — Tension wire usually goes at the bottom of your chain link fence and further tightens the mesh of your chain link fence. Keep pets and other small animals from crawling inside and out of your fence with tension wire.
- Chain Link Fabric — One of the most visible components of a chain link fence, the fabric ,or mesh, is used to create a barrier around your chain link posts.
Knowing the parts of a chain link fence will help anyone in the process of building or repairing a chain link fence. At first, it may seem daunting, but once everything is visualized and explained, there is really not much to it. Take a look at the diagram to see where all the chain link fittings and components are located. Let's break down all the components that make up a chain link fence.
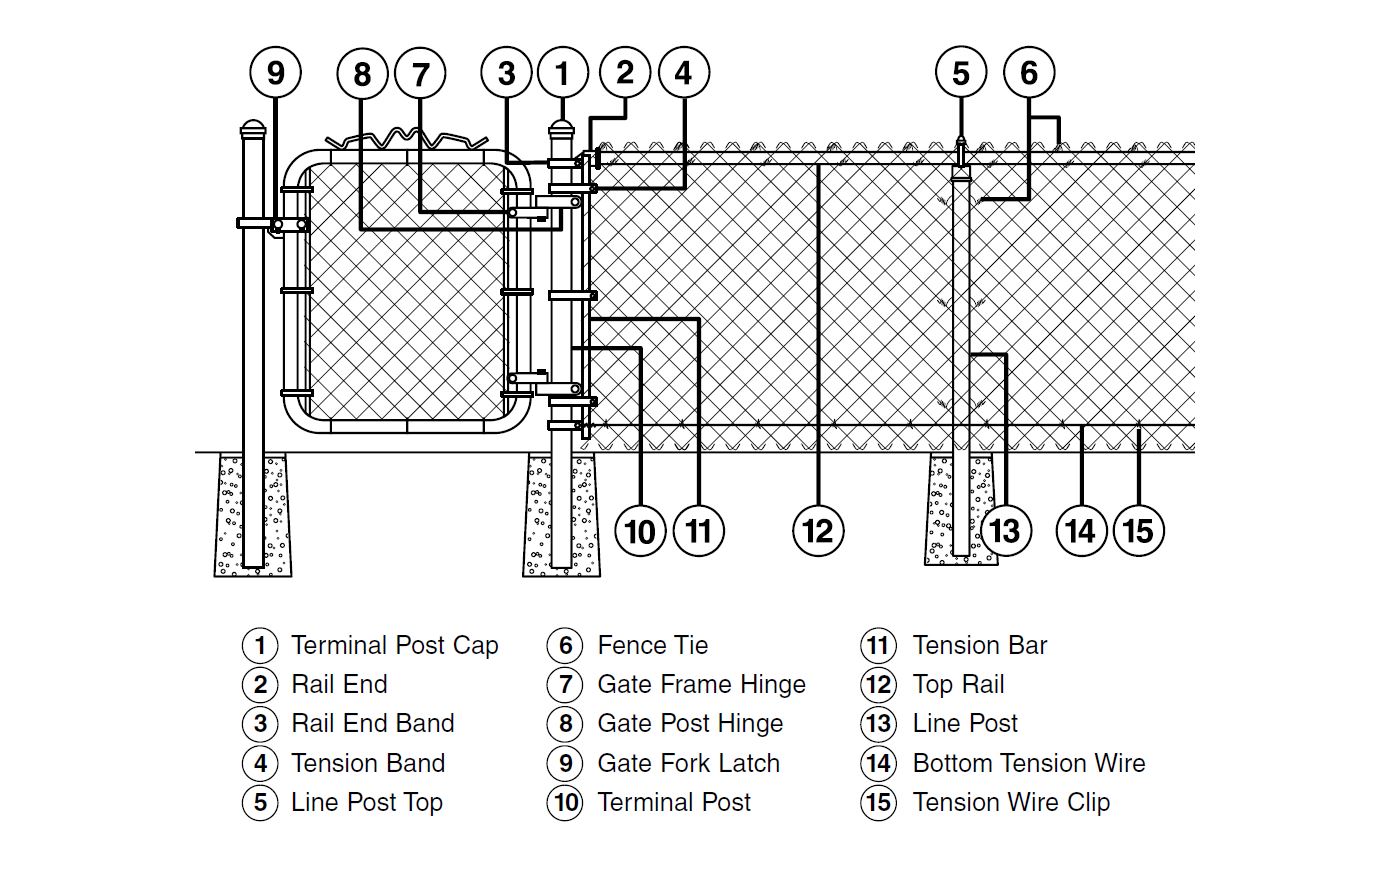
- Terminal Post Cap: The terminal post cap is going to be a post cap that will not have the top rail or top wire go through it. This cap will generally be a dome shape, acorn, or another aesthetically pleasing shape. They go on terminating posts which will be at gates, corners, or ends.
- Rail End: The rail end terminates into a cup or a clamp, but cups are the most common. The end rail cup will be fastened to the brace band or rail end band. The top rail will slot into the cup during installation.
- Rail End Band: These are more commonly called brace bands. They attach to the end rail cup on the top and the tension wire on the bottom of the post. Two are required; one for the top and one for the bottom.
- Tension Band: The tension band is what holds the tension bar in place. This is what is going to hold the fence taut. The tension bands fit in between the brace bands. You should have 1 less than the height in feet of the fence. For example, you should have 3 tension bands if the fence is 4 feet tall.
- Line Post Top: The line post top is going to be used on the line posts. They will have a loop at the top so the top rail or a top tension wire can go through. If the line post top is offset, put the rail side on the outer part of the fence.
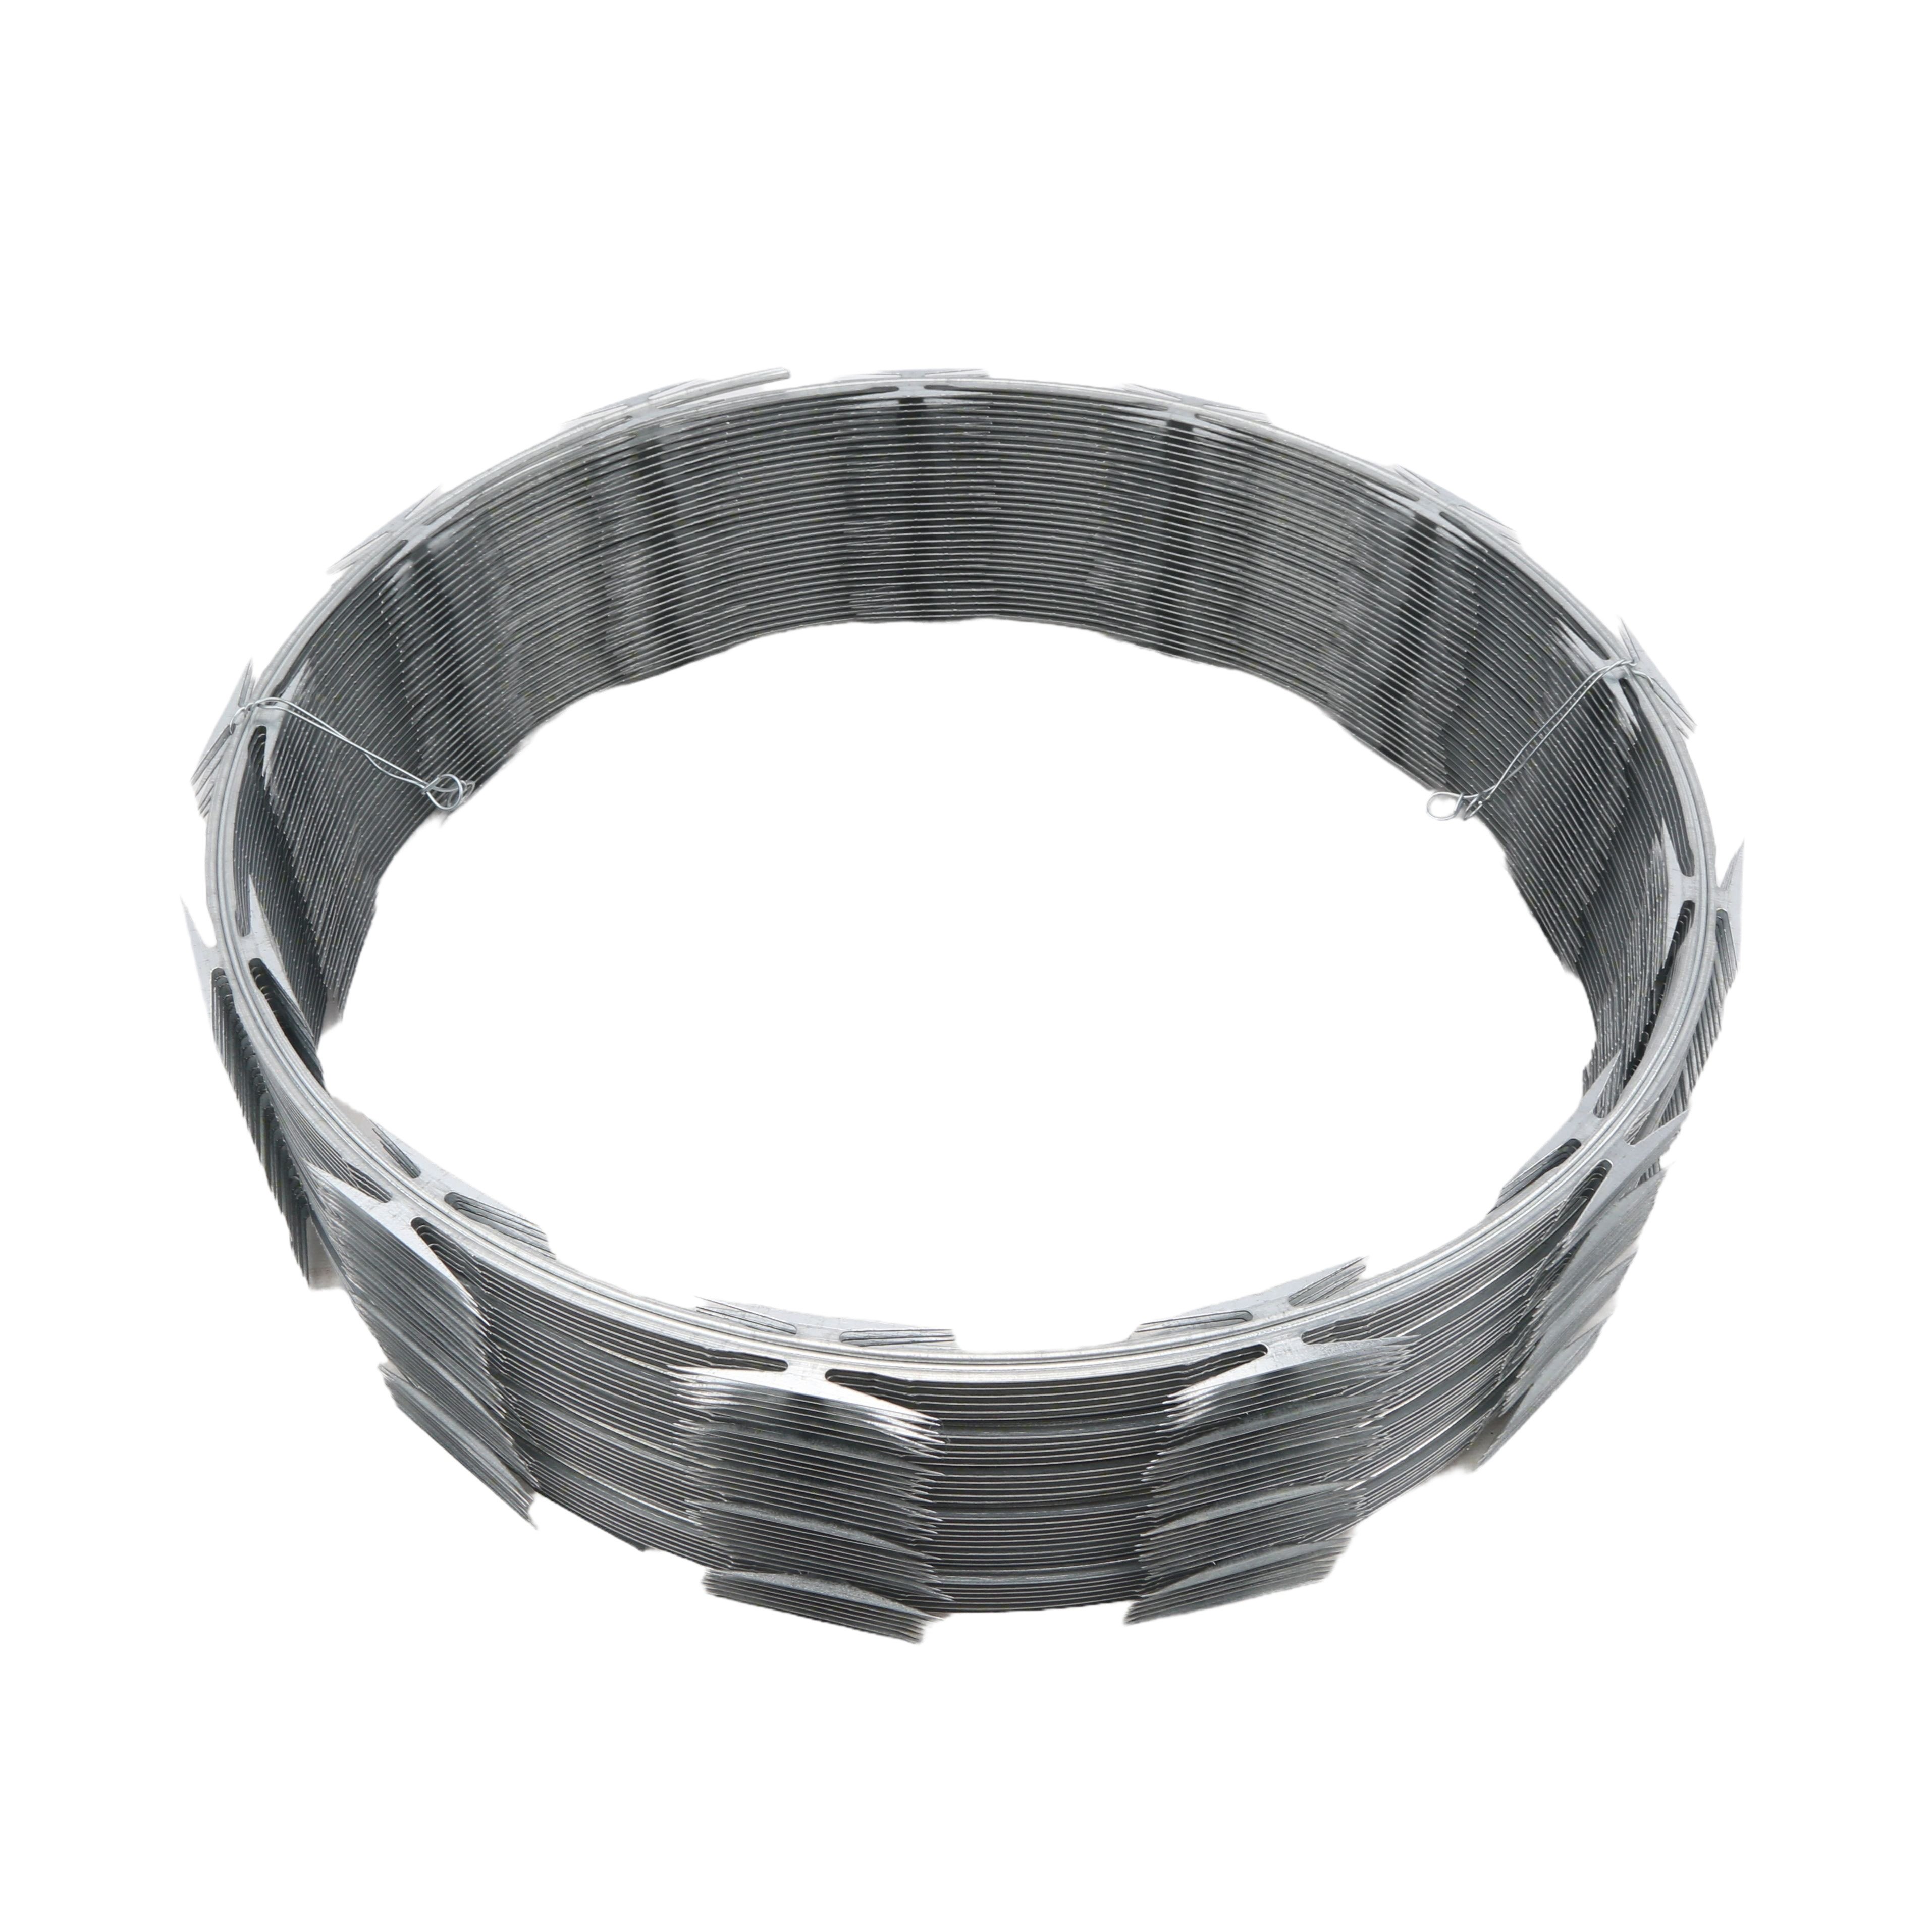
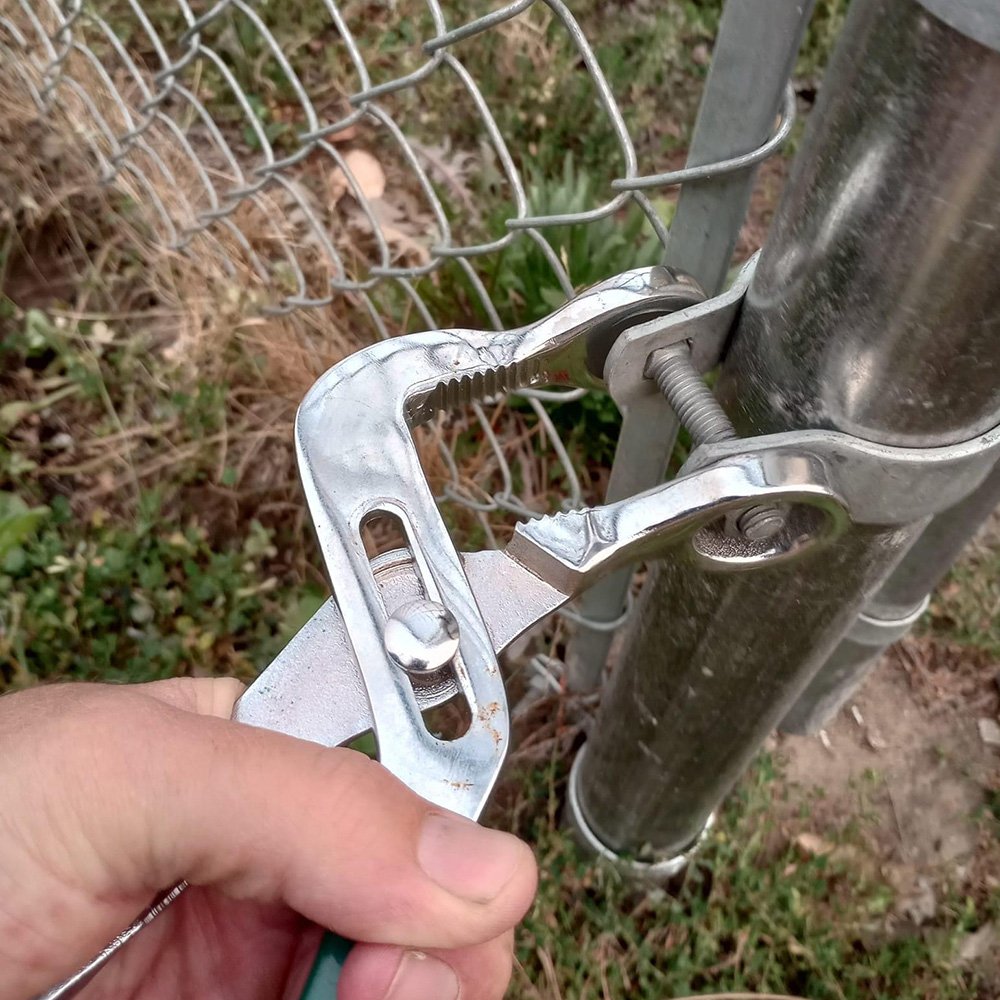
- Fence Tie: Fence ties are just like what they sound like. They are used to tie the fence mesh or sometimes called fabric, to the posts, top rail, and tension wire. Be sure to use gloves and pliers when handling the ties, as they can be tough to bend sometimes.
- Gate Frame Hinge: The gate frame hinge is sometimes called a female gate hinge. It attaches to the gate frame and is coupled with the gate post hinge.
- Gate Post Hinge: Similar to the gate frame hinge, this is referred to as the male gate hinge. It attaches to the gate post and slots into the female gate hinge. This is what gives the gate the ability to open and close.
- Gate Fork Latch: Gate fork latches are used with gate fork collars so that the gate can stay closed. These come in various styles and can be configured in many ways to fit the aesthetic of the chain link fence.
- Terminal Post: Terminal posts are where a section of a chain link fence stop. Terminal posts are generally a little wider in diameter compared to line posts. They are also set deeper into the ground since these posts will hold most of the fence tension. Gate posts, corner posts, and end posts are considered types of terminal posts.
- Tension Bar: The tension bar attaches the chain link mesh with the tension bands. The tension bar is woven in and out of the diamond pattern on the mesh and then attached to the tension bands. These are found at every terminating post.
- Top Rail: The top rail is the tubing that is run along the top of the fence. It slots into the end rail cups and goes through the line post caps. They can be connected using sleeves. They also hold up the chain link mesh using fence ties.
- Line Post: The line post is a type of post that is used in between terminating posts. They can vary on the spacing, so check out our post spacing guide for information. They hold the chain link mesh using fence ties like the top rail and terminal posts. They can be smaller than the terminal posts since they will not hold as much weight.
- Bottom Tension Wire: The tension wire is set on the bottom or the top, but this helps stabilize the fence and the chain link fabric. It runs the entire length and attaches to the brace band. Use fence ties or hog wire to attach the fabric to the tension wire so the fence fabric cannot be pushed away.
- Tension Wire Clip: The tension wire clip or sometimes called hog rings/ties are used to attach the tension wire to the fence mesh. Use gloves and pliers when handling them, as these can be tough to bend.
Knowing the parts of a chain link fence will make things a lot easier when needing to install or purchase replacement parts. Check out our other articles, which are listed at the bottom of the page, to find more helpful information on everything chain link fences. If you have any questions or would like to place an order, feel free to contact one of our knowledgeable sales representatives.
Chain Link Fence Parts - Explained in Video
To make identifying these parts even easier, we’ve included supplemental videos that will walk you through the full anatomy of a chain link fence and all the different gate hardware you may need. Theses visual guides show exactly where each component goes and how they work; such as tension bars, post caps, brace bands, tension bands, terminal posts, top rails, line posts, hinges, latches, and more. You’ll see how each piece connects, supports, and reinforces the fence, helping you better understand both the structure and function of every part.